March 2018
The plan for March was to clear coat all the remaining deck timbers, the freeboard and rear deck king plank.
So I mixed up a load of West 207 clear coat and set to work.
Well it's just too cold, the stuff just stays soft. No point sanding that....
Best wait until it warms up a little I think.
Time to start another project.
Inspired by
this article
in
Make: magazine
I decided I could use an
Adafruit Feather Huzzah to build a tide clock.
If your tides are every 6 hours and 13 minutes then the std tide clock works well. But if your tides are
semi diurnal
with a
dwell
in the flood tide then at ~5 hours out and ~7.5 hours in you need a bespoke clock.
So one that gets it's time from the internet and the state of the tides via an API will be more accurate. Well, as accurate as the tides API....
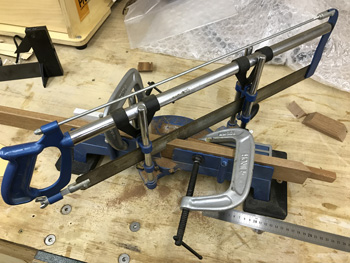 So using some left over deck timber. I do love recycling. I fashioned a frame using my fathers old mitre saw. What a great piece of kit!
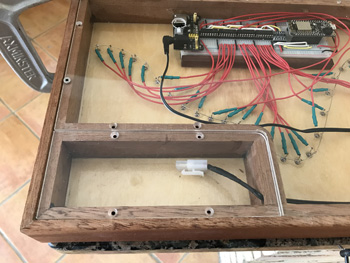
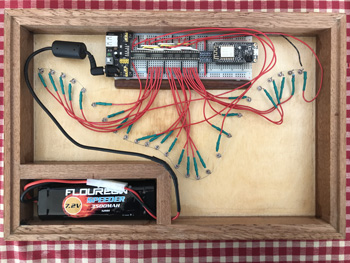 Here's a view from the back showing the LEDs, the wiring and electronics. The frame has a 3mm groove set back 3mm from the front edge for the sheet of
3mm thick birch ply
.
Here's a view from the back showing the LEDs, the wiring and electronics. The frame has a 3mm groove set back 3mm from the front edge for the sheet of
3mm thick birch ply
.
All glued together with my wood glue of choice
Titebond
wood glue.
The rebate in the back of the frame is for a 3mm clear perspex cover. People always like to know what's inside.
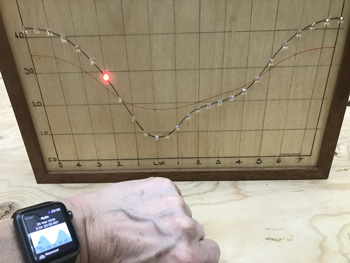
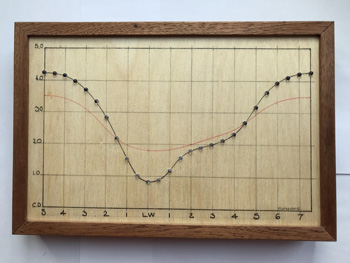 Here is a view from the front. This shows the actual tide progression and the
dwell or 'stand' on the flood tide. This phenomenon is known as the
'Young flood stand'
.
Here is a view from the front. This shows the actual tide progression and the
dwell or 'stand' on the flood tide. This phenomenon is known as the
'Young flood stand'
.
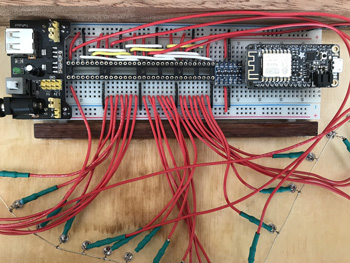 Here's a close up of the chips. I built the electronics on a breadboard because I had one and they are so versatile. What I didn't have I sourced on Ebay. The power supply is a
YwRobot Power supply
providing both 5v and the 3.3v required for the level shifter. The ESP8266 requires 3.3v but has an on board regulator so I used the 5v rail to power it.
Here's a close up of the chips. I built the electronics on a breadboard because I had one and they are so versatile. What I didn't have I sourced on Ebay. The power supply is a
YwRobot Power supply
providing both 5v and the 3.3v required for the level shifter. The ESP8266 requires 3.3v but has an on board regulator so I used the 5v rail to power it.
The YwRobot is a one stop shop; dual output voltage, it accepts a range of input voltages (I'm using a
Floureon 7.2V 3500mAh NiMH
6 Cell Rechargeable RC Battery with Tamiya Plug by
Floureon. I prefer to stay away from LiPo technology. If you need to charge a battery in a fireproof box then maybe that's a step further than I need to go.
), power LED, USB input. What's not to like.
The current processor is an Adafruit Feather Huzzah although I'm looking at using a
NodeMcu ESP8266
as I'm not using the LiPo charging facility that the Adafruit product has built in.
 The perspex cover came from
PerspexSheetUK
ready cut to size. I made the battery cover a separate piece as this will have to be removed for occasional battery charging.
The perspex cover came from
PerspexSheetUK
ready cut to size. I made the battery cover a separate piece as this will have to be removed for occasional battery charging.
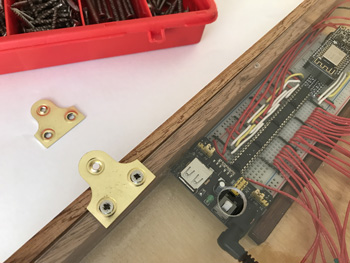 To hang it on the wall I used these cheap brass brackets. I only had one old fashioned bracket so had to settle for these rather modern looking pieces...
The screws are stainless as they always have to be when you are by the sea. Brass screws, which looks more appropriate, aren't so good when you have to keep removing and refitting.
The large hole in the perspex sheet is to access the on/off button on the YwRobot power supply.
 Looking good
For a detailed build description check out my
Tide Clock build page.